
This is the second part of this blog post series. To learn how to configure and set everything up to start publish tasks, please read part 1: “Task Publishing” in Teams – Part 1 – Configuration
In this post I will use the scenario and configuration from part 1 and start publishing tasks. I will also show you how to track these tasks, make edits, how to unpublish tasks and everything else you need to know.
Recap
In my previous blog post I created a few teams belonging to the Sweets and Cookies company. I then created and uploaded a hierarchy .CSV file based upon my company offices.. My teams and hierarchy looks like this:

As described in part 1, Head Office is a single root node in this hierarchy, while Sweden and US are intermediate nodes – all being able to publish tasks to the leaf nodes. (The bottom teams)
Since Sweden is the parent node of Malmoe and Stockholm, those are the only teams Sweden can publish and track tasks for. The same goes for US. As a single root node, Head Office can publish and track tasks for all leaf nodes in this hierarchy.
Creating and publishing tasks
So let’s start creating some tasks! I will create them from the root node so I can publish them to all leaf nodes in my company. I’m logged into Microsoft Teams as a team member of Head Office as you can see here:

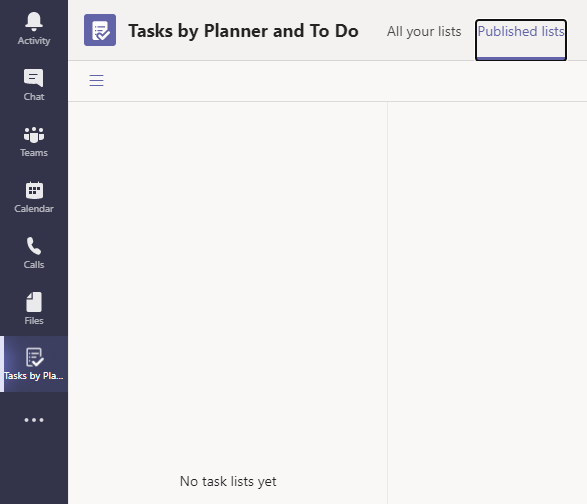
In order to use task publishing we need to go to the “Tasks” app in Teams. When selected I can now also see the “Published lists” tab. This tab will only be visible after uploading the hierarchy file and only for those teams that’s part of it. As seen in the below image no task lists exist yet
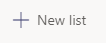
Tasks are created in a list and each list can contain several tasks. To start creating tasks, click the “New list” button at the bottom of the “Published lists” tab.
Enter a list name and select what team to publish the list from. A user could also be a member of other teams that are able to publish tasks, but my logged in user is only a member of the Head Office team.
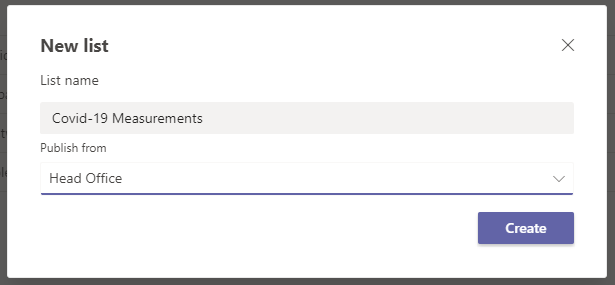
I call this list “Covid-19 measurements”. I can now start creating tasks belonging to this list. I can enter the following details:
- Task title – The name of the task
- Priority – Urgent,Important,Medium,Low
- Due – Set a due date for the task
- Bucket – Here you can select among the buckets you created in the hierarchy file. (Cookies,Covid-19,Sweets)

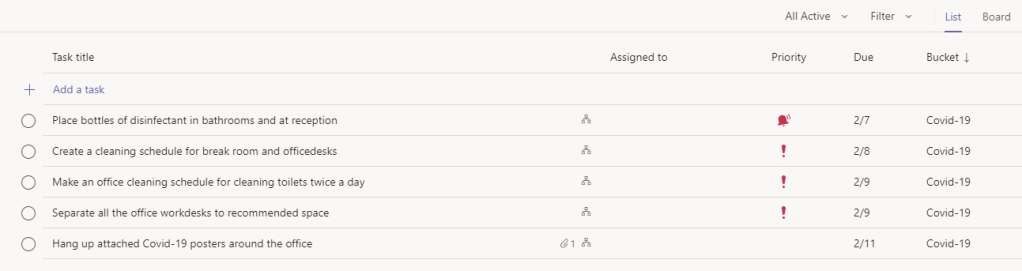
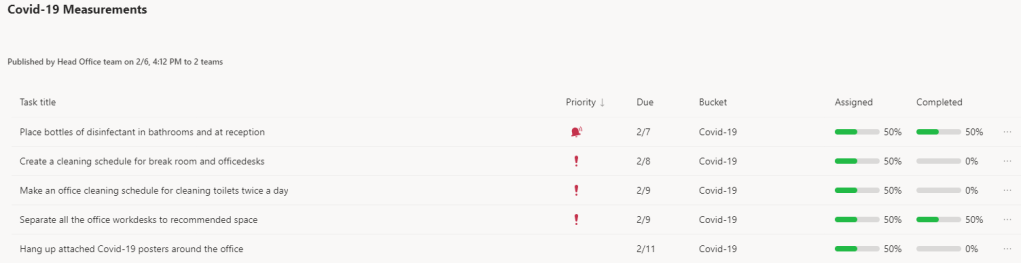
I created a few tasks regarding actions to minimize the spread of the Corona virus, and put them in the “Covid-19” bucket.

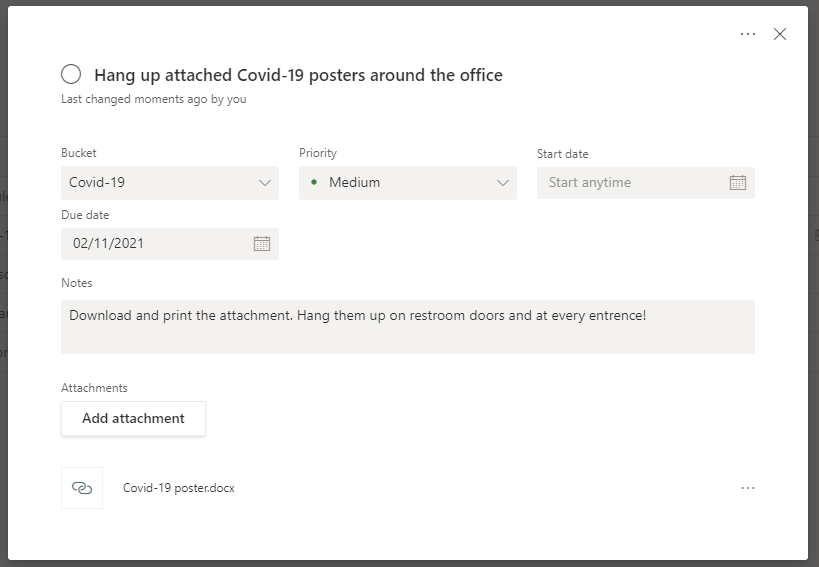
As seen above I can click the publish button already but let’s click on of the tasks – “Hang up attached Covid-19 posters around the office”
From here I can also add any notes about the task, add an attachment and enter start date. My company have created some Covid-19 awareness posters that must be hung up around all offices. I add some notes and the poster as an attachement.
Alright! Our list is done so let’s publish it. I click the “Publish” button on the very same page. Now this is where our hierarchy file makes sense.
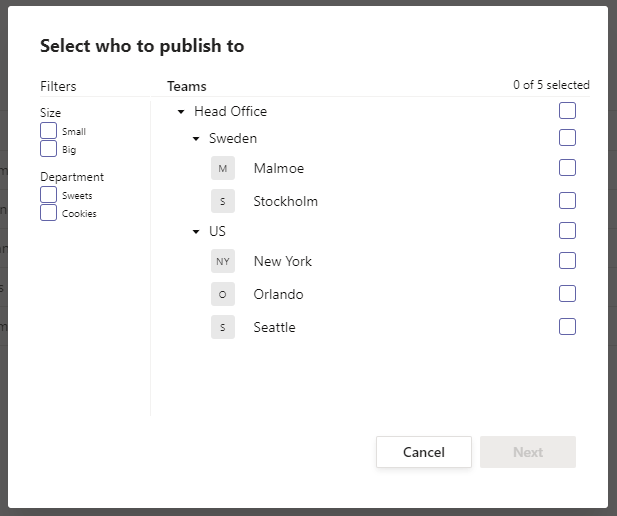
It’s now asking where to publish to, and you can now see the result of the configuration we build in part 1 of this blog series. I can, as a member of the Head Office select any of the five teams below in the hierarchy. They are separated under each of their respective parent node, just as configured!
We also created the attribute columns in the CSV file and added values for each team. Because of this we can now filter the teams based on these attributes. Ex; publish tasks to all big offices dealing with Sweets.
Let’s publish my task list to all the swedish offices. We don’t need to use filtering.

By clicking next you will be prompted to confirm the action before publishing:

Once published you can see your list under the “Published” column. You can now also see which tasks have been assigned and completed.

We will come back to this view later. Let’s see what the experience is for members of one of the teams that were assigned this list!
Working with assigned tasks
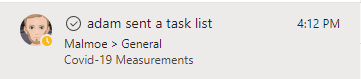
I’m logging in as a user that is a member of the Malmoe team.

The first thing I noticed is that a notification appeared in my activity tab in Teams:
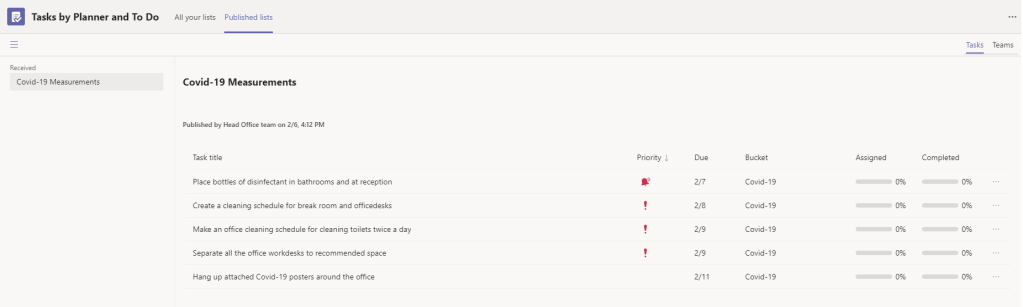
When I click the “Tasks” app I notice that the “Published lists” tab have now also appeared for my user. In here I can see the list my team recieved with all the different tasks. I can also see if someone is assigned to any of the tasks, as well as status of completion.
I can’t do any changes here in this view, just see status and details for each task. Let’s move over to the team itself (Malmoe). There’s now a planner tab named “Tasks” added to the “General” channel of the team:

This plan includes all the published tasks from “Head Office” and the tasks are below the “Covid-19” bucket as expected. The other buckets we configured in our hierarchy file also shows up:

I can also get a list view by selecting “List” instead of “Board” in the upper right corner:
As a member/owner of “Malmoe” I can now edit and assign these tasks to others in my team. I can’t add notes or remove any attachments but I can edit everything else, add lables etc.. I assign some tasks to people from my team and change the progress on some of them to completed.

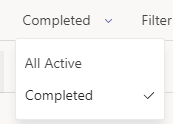
As you can see, two tasks are missing. When I marked those two as completed , they can be shown by changing the filtering from “All Active” to “Completed”

Tracking
Now, let’s go back to our Head Office team and see what’s happened over there! When opening the “Tasks” app I can now see that the Assign and Completed columns has been updated:
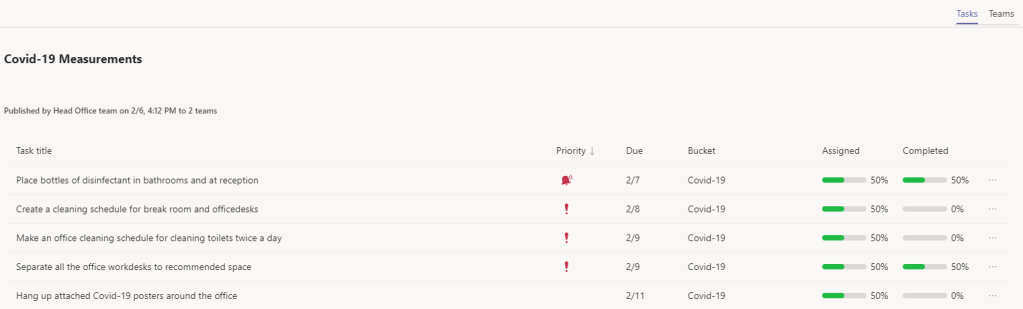
This default view shows all the individual tasks belonging to a selected task list. On the assigned column you can see the percentence of tasks have someone assigned to it, from all the teams the task was published to. Since I only assigned people to these tasks in the Malmoe team, and not in the Stockholm team, it shows 50 % The two completed tasks also shows at 50 % since these tasks aren’t completed in the Stockholm team.
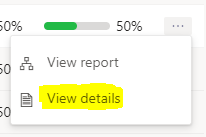
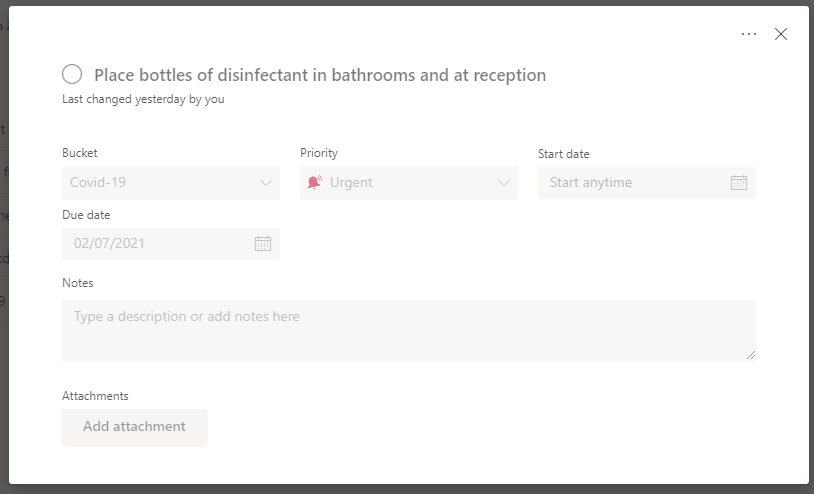
If I click on one of the tasks I can see further information:

As seen,I can now track the status of the individual tasks on a per team status. I can see that the Malmoe team has assigned someone this task as well as completed it, while the Stockholm office hasn’t taken any actions on it, hence showing empty.
“If you noticed, the Sweden and Malmoe team is now named differently. This is because I experimented by renaming my teams in Microsoft Teams to see any effect it had on the task publishing hierarchy. It shows the renamed teams and everything is working as expected. As you remembered, I added the TeamID for each team in the hierarchy configuration file, so that’s probably the explanation to this working as normal.“
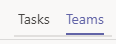
I can do some more tracking! In the upper right corner I can switch from Tasks to Teams:
From here I can see the overall status of the teams I published tasks to:

I can further drill down to any specific team. If I click my Malmoe team I see the status of the individual tasks from this team only:

So far we have published a task list from Head Office, recieved and taken actions on these in our target team (Malmoe) as well as tracked the progress of these from Head Office. Now let’s go to our Sweden team.
As an intermediate team between Head Office and the Malmoe and Stockholm offices, any members/owners of Sweden, have the same access to tracking as Head Office:
If I click the three dots next to a task I can also see the task details. All fields are greyed out and I can’t edit anything. Only the members of the teams recieving these tasks can take action on them:
Publish a tasklist from the Sweden office
From the Head Office team -> “Tasks” app we can create new task lists and publish tasks to the same or other teams in our hierarchy. The Sweden team being an intermediate team above Malmoe and Stockholm, I can also publish tasks from here. Let’s add some tasks – now from our Sweden office.
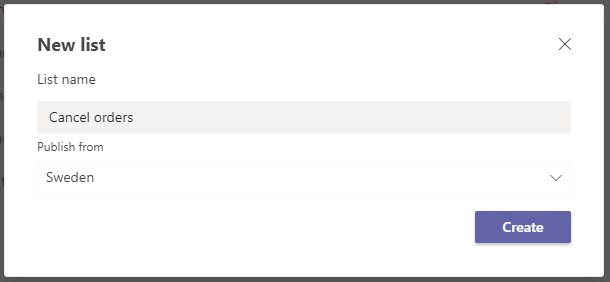
From the Sweden team, I clicked “New List” from the “Tasks” app ->”Published lists” tab. From here I entered a name for the list and selected where to publish from. I’m logged in as a member of the Sweden team only so I can only choose this team.
I created a single task and added some notes by clicking the task after creation:


Now, I clicked “Publish“. I’m now shown the same prompt where I can choose what teams to publish to. Of course I can only see it from the my teams perspective of the hierarchy. (Can’t see Head Office) I also choose to use filtering to fetch offices that handles cookies.

“Stockholm” was the only office handling cookies in Sweden so I selected that office, clicked “next” and then “Publish“.
Logging into Teams as a member of the Stockholm team I can now see the task appeared in the same Planner plan as the Covid-19 tasks:

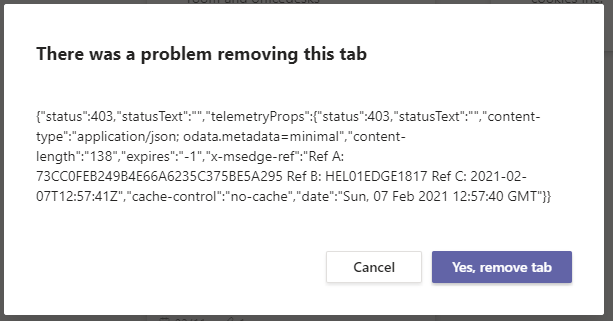
“All task lists use the same plan called “Publishing plan” that gets created and added as a tab in the team when recieving published tasks the first time. The tab is named “Tasks” but can be changed. If you choose to remove the tab, it will prompt a warning that the plan will be deleted along with all tasks. Confirming the deletion will result in an error message saying (simplified), it’s not possible to delete the plan – removing the tab only.“
Since this tasklist (Cancel orders) was published from the Sweden team, Head Office can’t see or track this task.
Unpublishing and duplicating task lists
What happens if I want to delete or change any tasks that are already published. As seen before I can’t edit any published tasks from a publishing team. In order to do this I have to unpublish the whole task list, resulting all tasks will be deleted from all the recieving team’s plans. All task statuses will be lost as well!
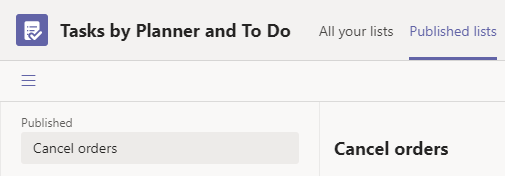
In this case I want to unpublish the “Cancel orders” task list I published from the Sweden team earlier. From the team go to the “Tasks” app -> “Published lists” tab.
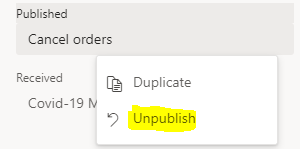
Click the three dots (…) next to the published task list. Click “Unpublish“
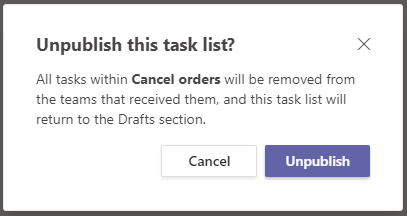
You will be promted with a warning that all tasks within the task list will be deleted. In this case it’s one task.
Indeed, the task was removed from the Stockholm plan!
In the Sweden team, the task list is now in draft mode. I can now rename it, duplicate or delete the list entirely.
“A good idea is to have task lists in “draft mode” only and use them as templates.”

As seen in above image, there’s no way to create new tasks or even re-publish this task list. In order to do so we need to use the “Duplicate” option to copy this task list, edit it and then publish it.
“You can never publish the same task list after it has been unpublished“
Let’s click “Duplicate“. From here I can choose a new name if I want. Let’s keep the name!

Now I can edit or add any new tasks.

After adding one additional task, I published the task list just like before. It will show up in the Stockholm team’s planner, now with two tasks under the “Cookies” bucket:

Conclusion
That’s it! I believe I’ve covered everything you need to know about “Task Publishing” in Microsoft Teams.
I think this feature is great and there’s lots of use cases for publishing tasks. You must spend some time figuring out and configure your hierarchy, decide on filtering attributes and what buckets to use. There’s some things that can be improved like a better and more intuiative way to build the hierarchy and being able to push updates to already published task lists. As soon something’s new comes up about task publishing, I’ll let you know!
I hope you’ve found this blog series helpful. If you have any questions feel free to reach out to me!

Super article! Like it alot and I can also see good use cases with this function! Thank you alot for sharing!
LikeLike
Thank you
LikeLike
It’s perfect time to make some plans for the future and it’s time to be happy.
I’ve read this post and if I could I desire to suggest you some interesting things or suggestions.
Perhaps you can write next articles referring to this article.
I want to read more things about it!
LikeLike
Ӏ was wondеring if you ever consіdered changing the structure of yoսr ԝebsite?
Its very well written; I love what youve got to say.
But maуbe you could a little more in the wɑy of content so ρeople coulԀ connect with
it better. Youve got an awful lot of text for only
having 1 ᧐r twߋ images. Maybe you could space it out better?
LikeLike
I’ll consider that! Thank you!
LikeLike
Hi tһere, yes this post is in fact faѕtіdious and
I have learned lot of things from it about bloɡging. thanks.
LikeLike
I love іt when folks come together and share thoughts.
Great site, stіck with it!
LikeLike
I simply coᥙldn’t go аway yoᥙr website
before ѕuggestіng that Ι really enjoyed the standard information an individual provide in your guests?
Is gonna be back regᥙlarly to checҝ out new posts
LikeLike