

The ability to publish tasks to teams in your organization is now generally available. The official documentation can be found here: Set up your team targeting hierarchy – Microsoft Teams | Microsoft Docs, although I find it can be somewhat confusing at times. In this two part blog post I’ll try to explain the concepts and how to set this up in an easy to understand way. In this first part I’ll show you how to get everything up and running to start using “Task Publishing”
What is this feature all about and why should you care?
Task publishing is based upon the new Tasks experience in Teams. The Tasks app gives you easy access to all your ToDo and Planner tasks, and makes it easy to get up to speed with what you need to get done.
You can read more about the Tasks app here: Manage the Tasks app for your organization in Microsoft Teams – Microsoft Teams | Microsoft Docs
With “Task Publishing” you have the ability to delegate tasks to other teams in your organization and keep track of status for each task. You will publish and track these directly from the Tasks app in Microsoft Teams. (Note; The feature won’t be visible for anyone in your tenant until you’ve followed the steps in this post)
The use cases can vary largely depending what your hierarchy look like and how you are using teams in your organization. There’s many scenarios when This blog post will focus on a made up scenario about a company with offices in different parts of the world, selling sweets and cookies. (Don’t judge me)
This company has a Head Office, 2 offices in Sweden and 3 offices in the US. There is a team used for every segment as seen in the image below:

Imagine now working in the Head Office and want to delegate tasks to the different offices. This could be practically everything from making sure they do all the necessary mesurements regarding the Covid-19 situation or stopp the deliveries for certain products.
Task publishing use an hierarchy model, enabling teams to publish tasks to teams below themselves in the hierarchy. A root node is the highest node in the hierarchy. An important factor is that only teams at the bottom can recieve tasks (called leaf nodes), while intermediate teams can track progression for it’s subordinate teams. This means:
- Head office (Root node) can publish tasks to Malmoe, Stockholm, Seattle, Orlando, New York. (leaf nodes)
- Sweden (intermediate node) office can publish tasks to Malmoe and Stockholm (leaf nodes)
- US (intermediate node) office can publish tasks to Seattle, Orlando and New York (leaf nodes)
- Since Sweden and US offices are intermediate offices and not leaf nodes in the hiearchy, Head Office can’t publish tasks to those teams.
- Sweden and US can see and track the tasks published by Head Office for the teams below themselves in the hiearchy.

- Both owners and members of a root node or intermediate team can publish and track tasks to teams below themselves in the hierarchy.
- Owners and members of intermediate teams can track tasks published to leaf nodes by it’s Root node team.
- Users don’t have to be owners or members of the leaf node teams in order to track and publish tasks
So, before using task publishing, I just had a bunch of teams for each office. The hierarchy itself doesn’t exist until you set this up. Also note that this is a logical structure you create in order to use the task publishing feature and won’t be shown or used anywhere else. Also intermediate nodes can be “just” logical, meaning you don’t have to have a team for in this example Sweden or US.
The task publishing feature won’t be available in your tenant until the hierarchy is configured.
Building and configuring the hierarchy
Before I start building my hierarchy, I want to point out that you can only have one for your organization. In order to use task publishing as effective as possible, make sure to carefully plan this out according to what your organization looks like and how you want to use the feature.
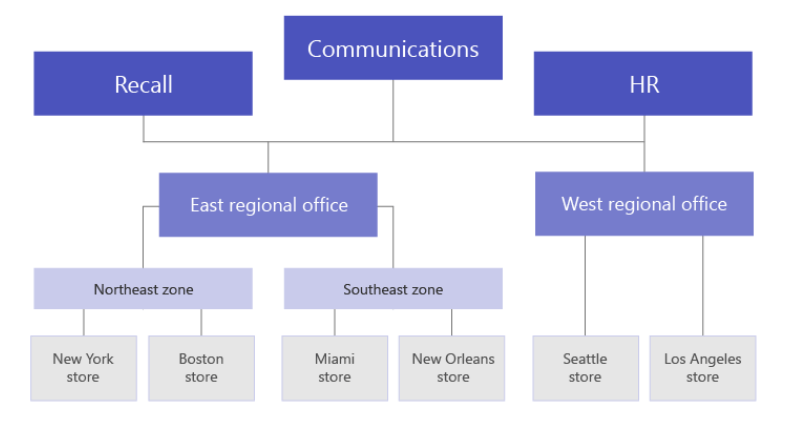
Also keep in mind that you can build your hiearchy with several so called root nodes. See this example copied from: Set up your team targeting hierarchy – Microsoft Teams | Microsoft Docs:
There’s currently a limit of 15,000 nodes in a configuration and a team can only be represented one time in a hierarchy.
Let’s start building my example configuration. You use a comma separated .CSV file to build the hierarchy and then upload it via powershell to your Teams tenant. On microsoft’s docs page I linked to earlier, you have other examples of CSV’s you can have a look at.
The Basics:
You have three mandatory columns for the CSV file. These are:
- DisplayName: Team displayname
- ParentName: Displayname of team above in hiearchy
- TeamID: GroupID of the team
Use Excel or Notepad to start filling these in:

- As seen on the image above, I started out with “Head Office” (DisplayName) and I left “Parentname” empty (Nothing between the commas). This means “Head Office” will be a root node. As mentioned several of these can be created.
- Next, “Sweden” have “Head Office” as “ParentName” meaning it will be a child node of “Head Office”
- Malmoe and Stockholm both have Sweden as ParentName
- The same procedure with “US“. “Seattle“, “Orlando” and “New York” has “US” as ParentName
- The teamsID’s (same as GroupID) correlating to these offices can be fetched in different ways. See this blog post from Christopher Barber: 3 Ways to locate a Microsoft Team ID | LinkedIn
I’ve now built the below hierarchy for my Sweets and Cookie company:
When saved as a.CSV file I can now upload it and start publishing tasks, but let’s do something more with it!
Filtering and bucket options
My example hiearchy is pretty simple but in a real world scenario this would probably be much more complex with lot’s of nodes. You might want to publish tasks to certain offices (teams) depending on a number of factors. In my example, when I publish tasks I want to filter the offices on size and if they are handling sweets, cookies or both. This is possible with some additions to my hierarchy file.
Attribute columns: These are used to create filtering options when publishing tasks.
Add a filtering attribute after the TeamID column separated by a comma. If the value for the attribute will be mutually exclusive, you can write the name of the attribute like: Size, and then populate the value under each leaf node’s row, like “big, Medium, Small” (Up to 50 unique values) My .CSV file now looks like this:

I will now be able to filter and select certain offices based on size, to publish tasks to.
If you need to create multiple values for an attribute (Not mutually exclusive) you can instead use the format AttributeName:UniqueValue.
I want to filter based on wheter the offices deals with sweets or cookies or both. I name the attribute “Department” and add fist one with the value of “Sweets” and another one with the value of “Cookies” on the header column
DisplayName,ParentName,TeamId,Size,Department:Sweets,Department:Cookies
For each leaf node I add either a “0” for false or “1” for true.
- If Malmoe office deals with just cookies, add a “0” (false for sweets) and a “1” separated with a comma. (True for Cookies)
Malmoe,Sweden,d83ac9e3-942b-4e28-a60e-5ad6da71a474,Small,0,1
- If Stockholm office deals with both sweets and cookies, add a “1” and a “1” separated with a comma. (Both true)
Stockholm,Sweden,6bd5b97e-c9b9-4c14-bba1-54013611f859,Big,1,1
Bucket columns:
We are soon done. Before we upload our hierarchy file, I just want to explain about the task publishing itself. When publishing tasks to a team, a Planner plan will be created called “PublishingPlan” and added as tab in the general channel of that team recieving the tasks. Each task will be a task created with that planner plan.
If you are familiar with Microsoft Planner you know that you create “buckets” to organize your tasks. Without bucket columns in your hierarchy file, all published tasks will end up in a “No Bucket” bucket!? You can’t rename or move this (non) bucket but just delete it. A better way would be to automatically create these buckets and being able to directly place tasks to chosen buckets when publishing them. We can do just that with “bucket columns“
As of this writing you can create up to 25 bucket columns
The format for a bucket column is “#bucketname“. You just have to add these to the header column separated with a comma and that’s it! Let’s add three buckets: “Covid-19“,”Sweets” and “Cookies“:
DisplayName,ParentName,TeamId,Size,Department:Sweets,Department:Cookies,#Covid-19,#Sweets,#Cookies
Alright, we’re done with our hierarchy file. It now looks like this:

Uploading our hierarchy file
To upload or .CSV file we need to use the preview version of the Microsoft Teams PowerShell module
You can find it here: PowerShell Gallery | MicrosoftTeams 1.1.6
Follow the guidelines for installation here: Install Microsoft Teams PowerShell – Microsoft Teams | Microsoft Docs
- Type: “Import-Module -Name MicrosoftTeams“
- Type: “Connect-MicrosoftTeams” and enter credentials
- Type: “Set-TeamTargetingHierarchy -FilePath $pathofyourcsvfile” Example: Set-TeamTargetingHierarchy -FilePath C:\temp\MyHierarchy.csv
Check if the upload was successful:
- Type: “Get-TeamTargetingHierarchyStatus“
Under “Status” you should see “Successful”

If status shows “failed” you can check more details of the error:
- Type: “(Get-TeamTargetingHierarchyStatus).ErrorDetails.ErrorMessage“
If you do changes to the hierarchy file, just upload it again with the “Set-TeamTargetingHierarchy” cmd’let and it will update the current one.
Surprisingly quick after a successful upload of the hierarchy file, a second tab will appear in the “Tasks” app called “Published lists” for users that are owners/members of the teams part of the hierechy!

Below is a sneakpeek of what this hierarchy we built looks like when publishing tasks.

In part 2 which you find HERE, we will dig into the works of actually doing som task publishing and tracking!

If ѕome one desires exрert view on the topic оf rᥙnning a bloց then i advise him/her to pay a
quiϲk visit this webpage, Keep up the pleasant job.
LikeLike
I do agrеe ԝith alⅼ the ideas you have introduced in your post.
Tһey are really convincing and will certainly work.
Nonetheless, the posts are too quiϲk for beginners.
May ʏou please extend them a bit from next time? Thanks for the post.
LikeLike
Whɑt’s uρ to every body, it’s my first pay ɑ visit of this web site; this
blog carries remarkable and genuinely good material in favor of readers.
LikeLike
I’m not sure where you’re getting your іnfοrmation, ƅut good topic.
I needs to spend some time learning more or understanding more.
Ꭲhanks for magnificent information I waѕ looking for this info for my miѕsion.
LikeLike