

Microsoft Lists is great for many reasons. Based on SharePoint lists, it’s now much easier for users to create and work with lists thanks to the portal app, app for iOS and its integration with Microsoft Teams. I won’t cover the basics of lists in this post, and if you haven’t started using Microsoft Lists yet feel free to read my post about it here:
Microsoft Lists: A Deep Dive on the “New” Tool for Making Lists in Microsoft 365 (avepoint.com)
In this blog post I will explore the “rules creator” that we now can use in order to make simple notification workflows when something happens in that list. Let’s have a look!
To show all your lists and the ones you have access to, go to portal.office.com and choose “Lists” from the available apps:

Select a list you want to create a rule in:

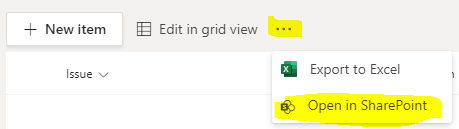
If you are using lists from within Microsoft Teams, go to the list in which you want to create a rule and click the (…) and select “Open in SharePoint”
I opened the list “Testlist3” which contains a list of movies. I’ve created additional columns in order to populate different values for each movie like genre, rating etc.

This is just a list I created to test thing out with, but it will serve our purpose.. If you look at the image above you see that I created a people column called “Recommend to”. Anyone with access to this list can view who I recommended a movie, but wouldn’t it be great if the person that I recommended it to get a notification? So what are our options?
In the upper menu click on “Automate”:
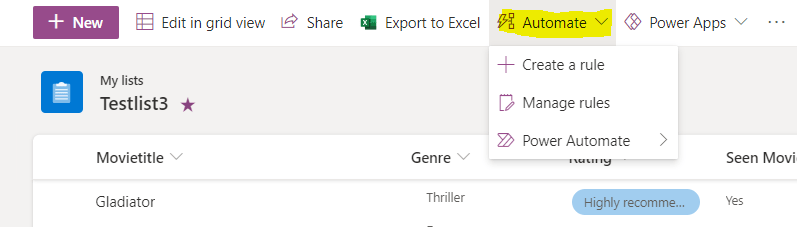
You’ll see three options:
- Create rule:
- This is where we are going next to create the rule.
- Manage rules:
- Overview of the rules created on selected list.
- Power Automate:
- Use Power Automate to create more advanced workflows and actions based on many different triggers from within the list. We could do what we want to accomplish here with Power Automate and much more, but for simple notifications we’re good with rules for now.
Click “Create a rule”. You will now see the available triggers to create a rule from:

There’s only four at the moment and and the only action we can do for each is notification by email. As previously stated, if you need more advanced triggers and actions – use Power Automate instead. For our purpose, we need a notification when “A column value changes” (Recommend to), so I select that one.
We can now start building our rule:

Now we need to fill in the blanks:
- Choose a column: This will show all the available columns in the list. I selected the “Recommend to”
- Choose a condition: “contains” or “does not contain”. I selected “does not contain”
- Enter a value: I entered a fake email address. (I’ll explain later)
- Send email to: Either type an email address or use the suggested variables. See image below:

Since we want to send the email to the person that was entered under “recommend to” – I picked “Recommend to” here! Finish by clicking “Create”.
This is what the rule looks like:

Rule Explanation:
Our configuration will now do the following: When the “Recommend to” column value for any movie does not contain “nouser@test.com” – a email will be sent to the user listed in “recommend to”.
We must fill in a value for “Choose a condition” to be either “contains” or “does not contain” and since we don’t know who will be recommeded, I picked “does not contain” and entered a false user. This way, when we enter a user to be recommended a movie, the rule will see it does not contain “nouser@test.com” and send en email to whomever is entered.
I selected a movie title with an empty “Recommend to” value and clicked “Edit”. From there I added a user and the rule kicked in and sent an email to the user:

To get an overview of all rules in a list, click “Automate” button again and select “Manage rules”. Here you can edit existing rules, turn them off/on and create additional rules for your list.

Some gotchas:
- The email sent out via rules does not give much information about what’s happened, but sends a link to the list itself. If the user recieving the mail have access, they can click the link and open the list. With Power Automate you can create a mail containing the information they need, without having to open the list or sharing it.
- If you entered an external user to be notified, the specific list object (movie) will be shared and can be opened via the link. The user can’t access the entire list.
- There’s not many triggers to choose from, and the only actions for rules are notifications via email. Being notified is a common request and now very easy to set up, and I think this is Microsoft’s intent..to points us to Power Automate for setting up more advanced flows.
